Some users may experience temporary issues accessing parts of the site. Thanks for your patience.
- Office Hours Mon - Fri 9:00 am – 4:00 pm EST
 The use of digital photography has changed the practice of Complete Dentistry for the better. One reason is it allows us to view, edit, and modify images with ease.
A fundamental goal of Complete Dentistry is to provide patients with predictable, natural and long lasting restorations. The use of digital photography is a great way to help achieve this goal, allowing the treatment planning process (16 Step Checklist) to be more predictable.
The way we take these photos will affect how we assess or formulate our treatment plans. This in turn can have a direct effect on the final restorations for our patients.
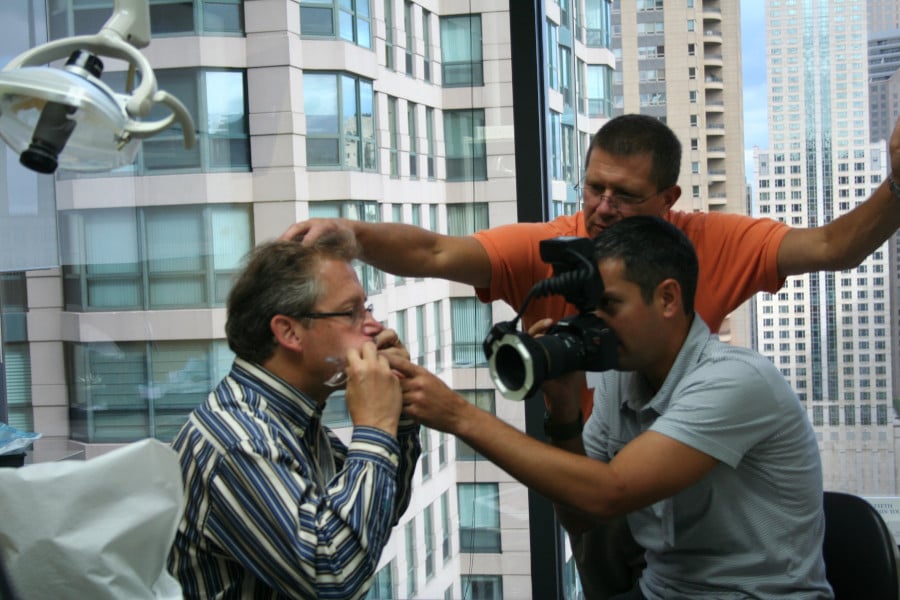
Most times, digital photos are taken while the patient is sitting in the dental operatory chair. With the way most dental operatory chairs are designed, the patient will always be sitting on an angle that is not parallel to the person taking the digital photos. In order to compensate for this change in angulations, the photographer needs to make appropriate adjustments. This causes possible fatigue or create photos that may look inconsistent.
It is recommended to have both the patient and the photographer sit face to face on the same linear plane. One way to do this is to have the patient sit on an assistant chair, while the photographer sits in the dentist chair.
It is critical to always make sure the camera position is the same for every photo taken (except for the occlusal photos). For example, if the camera is positioned slightly upwards or downwards, it can change the way we see the front teeth with respect to the upper and lower lips. This becomes even more critical when evaluating the upper incisal edge position on an E Smile or Rest or Repose photograph.
If both the patient and the photographer are correctly positioned, then the camera will also be positioned correctly, thereby eliminating or avoiding this mistake.
There are two basic settings that are important to remember: the F stop and Lens” setting. The former is responsible for the amount of light that enters the camera, and the latter is responsible for magnification ratios or field of view.
When taking most of the photos, it is recommended that the F stop setting be somewhere between 22 and 32. This setting is adequate to allow enough light to capture the details needed. If you decrease the F-stop to 16, 18, or 20, then the image will BRIGHTEN – the smaller the F-stop (smaller than 22) then the MORE light it lets in. Try this next time – take your photo at F22, then at F16, you will see that F16 is brighter. The reason we want a higher F-stop is to get all of the image in focus (and we compensate for the lack of lighting by using flashes such as a ring flash).
The lens setting is designed to capture images of a certain magnification. We find that the best magnification ratio is 1:3 for most of the photos. This means the image captured is 3 times larger. For example, 1mm across an actual tooth will project 3mm in the captured image. Sometimes not using the correct ratio will allow the photographer to change distance position to maintain proper focus (manual focus), which will create images of different proportions. This becomes even more important with before and after images. These ratios must be consistent for any before and after images to be appreciated.
The most difficult photos to capture are the occlusal shots. Many times we see images that don’t show enough teeth, have incorrect angles, or show too much soft tissues (lips). This is due to a number of reasons, but the most common one is mirror positioning. If the mirror is not positioned correctly, the only way to capture the image is to change the camera position. This can take more time which can be frustrating for the patient and the photographer.
With the patient reclined, make sure they are retracting their lips away from the arch you are capturing. Place the mirror gently, resting directly on the opposite arch, and take your photo. It also helps to take the upper occlusal photo from behind the patient, and the lower one in front of the patient.
In most cases, patients have not experienced taking so many photos of their mouth in one appointment. When taking these photos, it is so important to maintain proper communication with your patient. Sometimes we find the photographer moving the camera around the patient to capture all the needed photos makes the patient uncomfortable. Also, due to space limitations, this can be a very difficult task to complete. It is much easier to take photos after asking your patient to move in the direction needed.
It also helps to have your patient practice the poses before taking the images. This can save valuable time, and make the experience more rewarding than frustrating. Always keep your patients engaged with proper dialogue while taking the photos. This makes them feel more involved in the process and that their efforts have been appreciated.
Digital dental photography can be very challenging at times, but also very rewarding. These are 5 mistakes that are very common but can be easily corrected with a little guidance. As most new changes go, we must become comfortable with the process. The best way to succeed in taking photographs is to become consistent in your technique. Become familiar with proper technique, and you will become proficient and efficient resulting in high quality images.
For additional help with photography and other records, consider attending our hands-on course, Examination & Records.
What other tips do you have for taking accurate photos?
ADA CERP is a service of the American Dental Association to assist dental professionals in identifying quality providers of continuing dental education. ADA CERP does not approve or endorse individual courses or instructors, nor does it imply acceptance of credit hours by boards of dentistry.
Concerns or complaints about a CE provider may be directed to the provider or to the Commission for Continuing Education Provider Recognition at ADA.org/CERP.